This afternoon I stopped at the local library to donate a bag full of books that I haven’t read in over a year. I figured the library would use those books way more than I ever would (and I know I’m right. As a former librarian, I can tell you: public libraries can always use public donations of books).
However, while I was there, I figured I would take a peek at their graphic novel section. I was hoping to see “The Sculptor” by Scott McCloud in there, but I didn’t see it and it wasn’t in the catalog.
(This is why it’s important to donate books to your local library: so that your books can be added to their catalog. And if it isn’t added, they can sell it and use that money to get – GASP – more books.
Though I was disappointed that “The Sculptor” wasn’t there on the shelves, I did find these three books, which made my day even better:
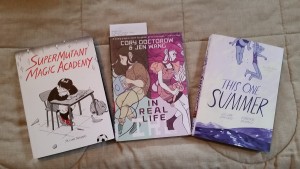
“Super Mutant Magic Academy” and “This One Summer” were graphic novels I had already heard about. But “In Real Life” by Cory Doctorow and Jen Wang was a new one.
I’m very excited to read all three, but I’m most excited for “In Real Life.” Just based on the premise (about a MMORG-playing girl who discovers someone in the game is running a scam to try and get out of poverty) it has a lot of promise, especially for moral grayness and ambiguity of morals…which is Jen Wang’s specialty. If you haven’t read her graphic novel “Koko Be Good,” read it and you’ll see what I mean.
Have you gone to your local library recently? Found any new books to read? Leave a comment below!
Thank you for reading.
You. Are. Awesome.