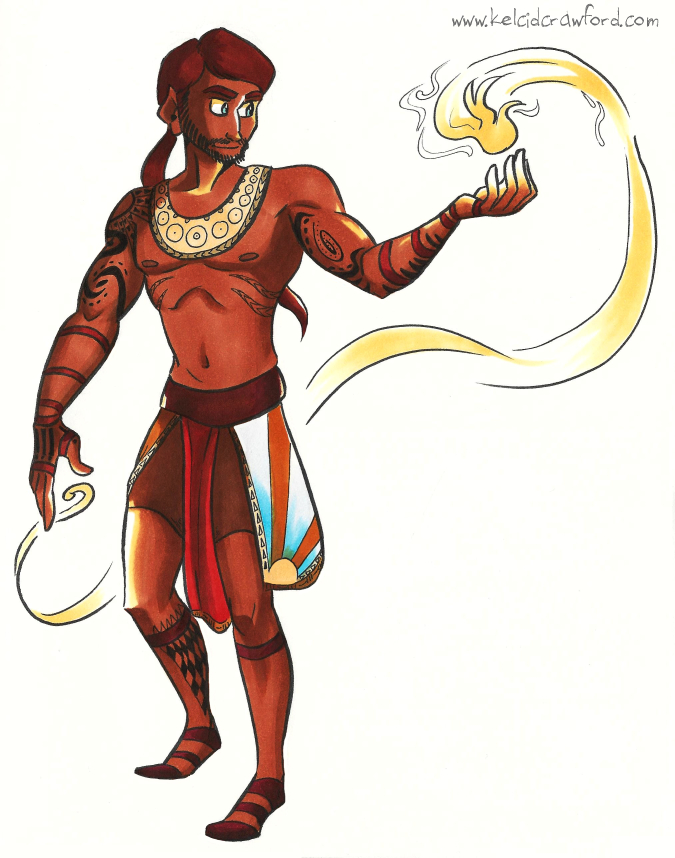
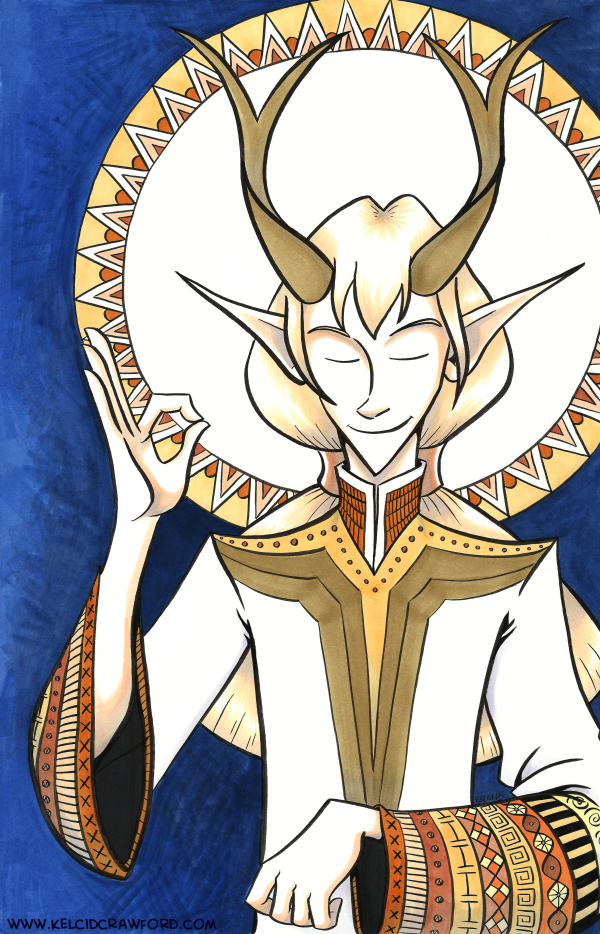
Step-by-Step Roxie Portrait

This post is the first in a week-long blog post update extravaganza! (It’s when I update my blog everyday, Monday through Friday, just for this week).

I just finished a new illustration in colored pencil! So to celebrate, I wanted to show the progression of how I made it and the tools I used. And at the end of the blog post, you can see the finished piece.

To start, I grabbed my Prismacolor 72 piece colored pencil set (which I had left over from my first ever art class in college. Hold on to your supplies, students!) and an 9 wide inch by 12 inch pad of Strathmore Toned Tan paper.

strathmore toned tan paper and prismacolor 72 piece set colored pencils


Once I got those, I drew the black and white version of what I wanted to color. I sketched in (lightly) where the shadows would lie with my trusty F hardness sketch pencil. I use that pencil for all of my drawing and sketching.

Then I go over those lines with my mechanical pencil, which I believe is a B hardness in lead, so it’s darker than the F.

Next, I color over the whole sketch with a white colored pencil. I do this so that…

  • I don’t lose my shadows
  • I have a layer of colored pencil between my pencil lines and my actual colors, thus
  • making my art much cleaner and less muddy.

Once the white is laid down, I lay down the brightest colors I’m going to use, and color from light to dark.

The first layer of colors end up looking a little like this:

colored pencil portrait of validation roxie in progress
Click to enlarge.

It’s not the prettiest…yet.

Also, I did not use light peach straightaway for the skin tone. I laid down the highlight color, which is a mix of Cream and Beige.

Alright, so I drew the light colors first. What next?

The shadows!

colored pencil portrait of validation roxie in progress 2
Click to enlarge.

I really wanted to try and find colors that would compliment Roxie’s hair, which is why I went with fuchsia industrial piercings, dark blue gauges, a purple camisole, and an orange-yellow tank top.

Also, use the color wheel. It is your friend.

color wheel tool
I got this sucker for around 6 or 7 US Dollars at a craft store in college. (Click to enlarge). One side is tints and the other is shades.

I used this to help me find the complimentary colors mentioned above, and it also helped me find what colors to use for shading.

So at this point, I have colored the highlights and the shades. There’s just one layer missing…

Oh I know! The mid tones!

I took the colors I wanted for the mid tones in each area, which went a little like this:

  • Mohawk: Spring Green
  • Shirt: Canary Yellow
  • Gauges: Cloud Blue
  • Camisole: Violet
  • Piercings: Magenta
  • Skin: Light Peach
  • Teeth: Cool Grey 20%

But after I colored the mid tones and finished out a few minor details (like the teeth), I noticed that the shade tones got lifted up a little.

So I went back over the mid tone layer with the shades again. Which went like this:

  • Mohawk: Dark Green
  • Shirt: Dark Brown
  • Gauges: Ultramarine
  • Camisole: layers of Violet Blue, Ultramarine, and Indigo Blue
  • Piercings: Mulberry
  • Skin: Sienna Brown
  • Teeth: French Grey 60%

Then I added some neutral tones like brown in the linings of the mouth.

The last step was VERY LIGHTLY adding Black on the edges to help delineate shadow.

Finally, at long last…

colored pencil portrait of validation roxie finished
FINISHED! Click to enlarge.

This portrait is finished!

Looking at it, there are still some errors that I notice (like her nose), but I have to say…

This is the first colored pencil piece of art I have made in a little over five years. I think I did alright. It’s not the best, but it’s not the worst. With practice, I’ll get better.

So what do you think? Should I do more portraits in colored pencil? Let me know your thoughts in the comments below!

In other news, the KickStarter for Seeing Him is wrapping up, and, to be honest, I don’t think we’ll make the goal.

But that’s ok! Kia and I have been talking behind-the-scenes and we have a few ideas for what to do next. I’ll be able to share them with you soon.

Thank you for reading, and I’ll see you back here on the blog tomorrow. Or in comments at Validation. Or Johnson & Sir. Or Charlie & Clow. Or Tumblr… I’M EVERYWHERE.

Interview with the Cast of “Seeing Him”

The following is an interview I had with the cast of Seeing Him, which is currently on KickStarter raising funds to launch it online. There’s also an extended interview, but you can only read it by claiming it (and other swag) as a reward on KickStarter.

Interviewees: (From Left to Right in the image below) Kate, Adam, Julianne, and Greg.

seeing him cast bust shots for mock interview for kickstarter
Click to enlarge.

KELCI: So what’s your day job?

Kate: I am a small business owner.

Adam: I’m a doctor. Specifically an OB/GYN.

Julianne: I’m a personal assistant to Ms. Betsy Brookes. You might have seen her face on benches around town. She runs the number one realty agency in Nagadan.

Greg: I teach high school Spanish at Charles Strite High. Go Hawks!

What are your hobbies outside of work?

K: I like to hang out with my friends. Play video games sometimes. Plus, in the winter I like to crochet and sew things.

A: Every other Wednesday we have league bowling. Greg and I are on the same team. I also go to the gym a good bit. Sometimes I go out to the movies.

Juli: Outside of work I like to do puzzles and books of brainteasers. I also like to watch horrible TV movies sometimes.

Greg: Well I do a few after-school groups as the faculty leader. I teach sign language and I manage the sci-fi club. Completely non work related I go bowling, I hit the gym, and I like to cook. Particularly baking.

Have you always lived in Nagadan?

Kate: I grew up here, but I went away for college.

Adam: My mother and I moved here when I was 2. Since then the only time I’ve lived anywhere else was when I was in med school.

Juli: Born and raised here, but then I went away to school. That’s where I met Kate. We were roommates freshman year.

Greg: I moved here after college. I grew up in a little town in the south end of the state. You’ve probably never heard of it. I always wanted to live in the big city though, so when I got the chance, I moved.

Favorite animal?

Kate: Ocelots. They are just too cute.

Adam: Dogs. They aren’t called man’s best friend for nothing.

Juli: Narwhales. The fat unicorns of the sea.

Greg: um. I don’t know. Penguins?

Favorite food?

Kate: Chicken and broccoli. Preferably from Mr. Wong Wong’s in Ostmeadow.

Adam: Mint chocolate chip ice cream.

Julianne: Definitely ham. I love having it for dinner and then getting to have real ham sandwiches all week.

Greg: Butterscotch muffins. Big ones.

How do you feel about musicals?

Kate: I love them but I haven’t taken the time to watch a lot of them. I’d love to see one live one day but right now I just watch my DVDs on repeat.

Adam: Meh. They aren’t the worst thing but I’d rather watch something else.

Juli: Some of them are good. Some of them are godawful. No one is that happy all the time.

Greg: …I’d rather not answer that in an interview. My friends might read this. So, on the record, I’m not a big fan.

Adam responding to Greg: You’re going to stick to that when I know for a fact you own at least 5 original cast CDs?

Greg: Yes, that’s my story.

Who is your role model/idol?

Kate: Adamantine Woman. Playgirl, philanthropist, badass.

Adam: My mom. She’s the reason I got into medicine. She’s made me who I am today.

Juli: I don’t have one. I am my role model.

Greg: The teacher from that one movie in the 80’s. You know, the one about the English teacher, they call him captain? That guy. Oh and Professor Y from the Y-Guys comics.

What is the nerdiest thing you have done?

Kate: I went to a comic convention dressed as Madame Majesty once. It was really fun.

Adam: Does being on dean’s list in college a lot count?

Juli: Kate made me dress as Monsieur Majesty at a convention once, but it turned out really fun actually.

Greg: I regularly played Orcs and Oracles with my friends in college. We had a campaign last 3 semesters once.

The following are questions about which of the options you prefer:

Ketchup or mustard?

K: Ketchup.

A: Mustard.

J: Neither. Mayo.

G: Ketchup.

Dandelions or dandy lions?

K: Dandy lions. All day.

A: Dandy lions would be a sight to see.

J: Dandy lions. All day.

G: Dandelions. I don’t want to make someone dress up a lion. Sounds dangerous.

Pancakes or waffles?

K: Why not both?

A: Pancakes.

J: Pancakes.

G: Waffles. Not the frozen ones though, real, homemade waffles.

Cupcakes or muffins?

K: Cupcakes.

A: Cupcakes.

J: Muffins. Cupcakes have too much icing on them.

G: Cupcakes.

Small gatherings with close friends in your living room or big dance parties with lots of people?

K: Small gatherings with friends.

A: Smaller gatherings are more fun.

J: Definitely big dance parties. I can meet new people that way. Plus show off my moves.

G: I like big parties, but house parties rather than dance parties. I like to be able to hear people.

Santa or the Great Pumpkin?

K: Great Pumpkin. Hands down. If I believe, he will appear someday.

A: Santa. I never did understand the great pumpkin idea.

J: Santa. He shows up more consistently.

G: Santa. I like how excited all the little kids at the mall are to tell him what they want for Christmas. If I ever get fat I’m going to be a mall Santa during the holidays.

Dinosaurs or dragons?

K: Dragons. They breathe fire so that makes them cooler.

A: Dinosaurs. The real life dragons. They actually lived so it makes them cooler.

J: Dinosaurs. I was really into them when I was a little kid. I even had a little stuffed T-Rex.

G: Dragons. I wish that scientists would splice them in the lab so that we can have fire breathing air travel. That would be badass.

Nerd or geek?

K: Me? I’m a geek.

A: I was always called a nerd, but I think I’d rather be a geek. They seem to have more fun.

J: Nereek. Everything is better when it’s a hybrid. Cars, dogs, ligers, everything.

G: Jock? But if those are my only options, I think I’d go nerd.

seeing him webcomic logo work in progress
Click to enlarge.

There’s also an extended interview!

The extended interview is available as part of our new rewards, available only on the KickStarter!

The KickStarter is barely to $300, and we have 10 days to go. If you can contribute, awesome! If you can’t financially donate, donate by using your words and telling everybody about it!

Thanks for reading, (thank you for contributing to the KickStarter), and I’ll see you again on Tuesday.

How I Make Validation

Last time I spoke about How I Make Johnson & Sir. Today I want to show how I make a comic strip for Validation, the other webcomic I work on, because the process is a little different.

If you ever get lost in the technical bits (especially in the Photoshop section), I explain some of those steps in How I Make Johnson & Sir so hopefully the techno-lingo won’t be so confusing.

Today, I’ll show how I made strip #105.

Step 1: Get the Script

I don’t (really) write Validation. Christian does (though we often talk story ideas over). I wait for her to send the script over to me first, and then…

Step 2: Layouts

Sometimes I skip this step, depending on how simple or complex the strips are in the script. Since I work in three panels, it’s important to know where characters will be placed and where speech balloons will go, to make the strip as readable as possible. That way it won’t be so cluttered.

I did not do layouts for strip #105 because it was scripted in a pretty straightforward way, and I had an idea for how I wanted the strip to look.

However, I’ll show the layouts I did for #103, which had some weird camera angles.

validation comic layouts
click to enlarge

Step 3: Ready the Paper

I tend to do this step ahead of time. Thankfully I can get two strips from a single sheet of 9 inch by 12 inch Strathmore Bristol Vellum, which is my paper of choice for Validation. I trim the paper (to make it easier to fit on my scanner) and I’m good to go.

Step 4: Pencil the Strip

validation webcomic strip pencilled art
click to enlarge

Pretty straightforward. Although, if you notice two extra characters, one looks like me and one looks like my boyfriend. Fun fact!

When that’s done, I send the pencils to Christian (via DropBox) for approval. This is where any changes that need made can be done, though 99.9% of the time she gives the ok.

Step 5: Ink

validation webcomic comic strip inked artwork
click to enlarge

Once I get the ok, I ink!

To add a little depth, especially in panel 2, I made the foreground figures in thicker lines to make them pop more. I used a micron pen with a 1.0 width. The background figure in Panel 3 was drawn mostly with 0.5 and 0.3 width pens, with finer details in a 0.1 width micron pen.

Step 6: Color with Markers

My markers of choice are (from most preferred to least)…

  1. Copic markers
  2. Prismacolor markers
  3. Sharpies

I used to do the entire comic in marker, but now I only do half. Sometimes it’s because a marker died, the markers will not blend well for the background, or I need a color I don’t have a marker for. So I just color what I can.

Step 7: Scan and Tweak in Photoshop

validation webcomic comic strip color artwork in photoshop
click to enlarge

Once marker coloring is done, I scan the strip in at 300 dpi (dots per inch) and open it in Photoshop. The first thing I do is adjust the brightness and contrast (shown in the above picture). That way the strip isn’t so dim. Then I adjust the curves.

validation webcomic comic strip color artwork on photoshop
click to enlarge

Doing this will let the colors really pop.

Once those adjustments are done, I make a new layer in Photoshop and call it “EDITS”. This is the layer where I correct color errors I made with the markers, fix any wonky lines, and clean up smudges and spots.

Step 8: Color the Background

Then I make another new layer on top of that and call it “BACKGROUND”, because here’s where I add background color.

validation webcomic comic strip artwork in photoshop coloring the background
click to enlarge

If you notice, I adjusted the blending options for this layer. For “EDITS” I left those settings alone, but with “BACKGROUND” I set it to Color Mode: “Multiply” at a Fill Opacity of 100%.

The reason I do this is because Multiply mode actually keeps the lines clean while still coloring. It works like this:

Screenshot 2014-05-30 13.58.57

Rather than it looking flat and gross like this:

Screenshot 2014-05-30 13.59.08

Then I just color in the background colors as needed.

validation webcomic comic strip art work in photoshop coloring the background
click to enlarge

Step 9: Color the Rest.

Once backgrounds are done, I make yet another layer on top and call that “FLATS.” I also set this layer to Color Mode: Multiply and Fill Opacity at 100%. This is where I color in the things my markers missed, like Jim’s coat and the game table.

validation webcomic comic strip artwork being colored in photoshop.
click to enlarge

…Sometimes I have another file open to reference for color.

Step 10: Color the Shadows

This step is one I talked about a little bit in my previous tutorial, but here you’ll really see it in action.

I make a new layer on top, call it “SHADES,” and then set to Color Mode: Multiply and – here’s the surprise – Fill Opacity at 35%.

Notice it’s not at 100%? That’s because I don’t want the shadows to be overpowering. I also want the color of the shadows to blend, instead of getting any weird effects that would happen if I changed the paint brush opacity (yes, you can do that).

Once I do that, I color the shadows in, and it looks like this.

validation webcomic comic strip art being colored in photoshop
click to enlarge

I did something a bit unusual in Panel 2: I put the two figures closest to the reader in shadow. I did this to frame the picture and keep the focus on Ally and Kyle.

So now the colors are done! I save the file, and then flatten the image so all the layers merge. Then I make another new layer and save the file for lettering.

Step 11: Write the dialogue

For this step, I have the open file of the script handy so I can refer to it.

Then I write the dialogue and captions.

validation webcomic comic strip lettering done in photoshop
click to enlarge

I try to arrange them in such a way that they won’t block too much of the art, and to ensure it can be read easily.

Then, once everything is written and checked for spelling, I get to the bottom layer, make a new layer, and start placing the balloons and boxes with the rectangle tool.

validation webcomic comic strip speech balloons and dialogue added to the final art
click to enlarge

I use the rounded rectangle for dialogue and the plain rectangle for narration.

To make the tail for that balloon, I got to the bottom layer again, made a new layer, and painted it in.

Once all of that is done, I merge the layers to flatten it out, and then…

Step 12: Save the File!

I save it first at its current size and call the file “Validation105_large.”

Then I adjust the image size.

click to enlarge
click to enlarge

The large file is at 300 dpi, which is the right size for print, but it isn’t too web-friendly. So to make it nice and tidy for the website, I shrink it from 300 dpi to 100 dpi. And I save that file as “Validation105_small.”

I send the finished strips to Christian via DropBox, and shazam! I’m done!

I hope you enjoyed looking at my process, and I hope you found something useful from it!

I’ll see you again on Wednesday.

The Women Warriors Project

Yesterday was the launch of a new and ongoing illustration series called The Women Warriors Project.

This is a project that I think is very important for a few reasons.

  1. Most history books and classes don’t really talk about women in general, much less women who fought in wars or were warriors in some capacity. It’s a shame because these women’s stories can add richness and depth to historical events that otherwise can be simplified into “good vs. evil” or some other dichotomy (I’m looking at you, World War II).
  2. When I was a little girl growing up in a rural Ohio town, I wanted to hear more stories and read more histories about girls and women being heroes or being fighters because I wanted to be brave like they were. Everyone was telling stories with boys in the lead, whether it was Napoleon, Goku, or Huckleberry Finn. But I wanted to hear more about the Paper Bag Princesses, or the Polgara the Sorceresses, or the Cimorenes. Sure they existed, but there weren’t enough and they were hard to find.
  3. I wanted to make a resource for those girls that are around today, who want to know the stories of real warrior women of the past like I did when I was a kid. Whether it’s for a book report or because you just really like badass women fighters, I wanted this project to be a source, a starting point, to get to know these historical women better.

In this project, I am doing my best to reference as many books and articles as possible to tell these stories and be historically accurate. However, I also recognize that this will be difficult because there aren’t too many books about women’s history that are available and accessible to the public.

The other problem that exists is that there are many women whose histories are not written down or recorded, or worse, their histories were changed by an outside perspective. This can make retelling the histories, even briefly, very challenging. But the challenge is accepted!

The books and articles I do use are going to be relevant and as accessible as possible to you, the reader, so you can read more about these awesome ladies.

This project is a jumping off point for research. It is by no means everything and every detail about the histories of these women. You are encouraged to read more about these women (as you should) and make your own conclusions about their achievements.

So who counts as a Woman Warrior?

I’m looking specifically for women (even trans women, if I can find them) who have participated in a war, battle, or revolution as a fighter and combatant. I’m also looking for women and trans women who are martial arts experts who have made a mark in history.

How often will it update with a new featured woman?

Right now, I’m planning on weekly updates every Monday, with each update on the Tumblr Page.

How long will the project last?

Into perpetuity! There are so many women warriors who deserve to be talked about that, at least at the moment, there’s no set finish line for this project.

Can other artists contribute to this project?

Eventually! I just started this recently, but in the future I’ll be looking for volunteers who want and are able to make art for this project. I’ll be making announcements when that time comes!

I’m not an artist, but how can I help?

Just reblogging or sharing posts with your friends, on Facebook and Twitter, and other sites helps out immensely. Also, try to keep any discussions that happen positive (I’m aware that there are minority groups that will try to put down this project. What they need is an education on what being a badass really means ;D).

Thank you for reading, and I hope you enjoy this project!

Illustrations and Commission Announcements

Today I knuckled down and started a four-page anthology submission. I even shared it on Facebook and Twitter, but I’ll share it here, too. Sorry for the crap quality, but I took the picture with my phone:

QueenPadminiPreview

It’s called The Story of Queen Padmini and it’s based on true events, detailed in my favorite book at the moment, Women Warriors: A History.

2014-01-30 21.21.36

Speaking of Women Warriors, I’m planning on making a new series of illustrations. Keep your eye on my Tumblr for updates, because that’s where the series will make their first appearance!

On the vlogging front, you might have noticed there was no update this week. Sorry!

My mind has been on getting new gigs lately, to add to what I have going at the moment. I’ll be opening up for commissions within the next few days, so keep checking in.

And speaking of gigs and commissions, I drew caricatures for three years. I think I might get back into that for a bit…

kelcicrawford_Caricature_1

As much as I love making comics, I also really miss interacting with customers when drawing caricatures. That was always the fun part of any day.

Anyway, I’ll be updating this blog a lot more often now. I’m aiming to update every day, so keep checking back for news and sketches (and other awesome things!).